Gradle in Android Studio
Gradle is an open-source build automation tool focused on flexibility and performance. Gradle build scripts are written using a Groovy or Kotlin DSL(Domain Specific Language). Android is using Gradle to automate and manage the build process. Also it defines flexible custom build configurations.
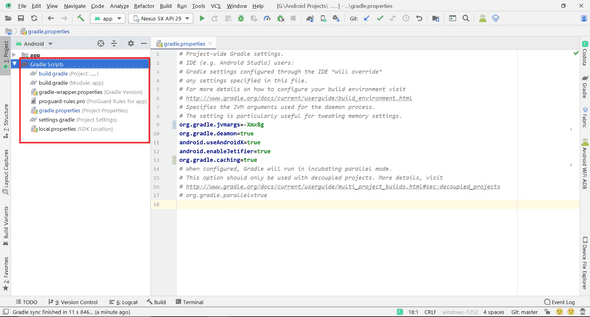
When you start a new project/application in Android Studio, it automatically generates some gradle related files for you.

- settings.gradle: Located in the root directory and it consists of all the modules present in your app. It tells Gradle which modules it should include when building your app.
-
build.gradle: The build.gradle file is of two type
- Top-level
build.gradle: Also known as project level build.gradle. It defines build configurations that apply to all modules in your project. build.gradle file uses the buildscript block to define the Gradle repositories and dependencies that are common to all modules in the project. - Module-level
build.gradle: Allows you to configure build settings for the specific module. Provides Module level custom packaging options.
- Top-level
-
gradle.properties: You can configure project-wide Gradle settings
- org.gradle.jvmargs=-Xmx1024M : Specifies heap space for your build. You can change this setting according to your memory size. It helps to increase the build performance of Gradle.
org.gradle.jvmargs=-Xmx1024M- org.gradle.daemon=(true,false) : Daemon is a background process that executes your builds. It reduces the build time taken by Android to install or update the gradles. By default it is false for the Gradle version before 3.0 , but is enabled by default starting with Gradle 3.0.
org.gradle.daemon=true- org.gradle.parallel=(true,false) : Enables the parallel execution of gradle daemon results in faster build execution. The parallel execution can happen only in two different projects/ apps.
org.gradle.parallel=true- org.gradle.caching=(true,false) : When set true, caching allows Gradle to reuse task outputs from any earlier build in any location on the local machine, when possible. If set false, Gradle will rebuild. When set true, it will store build outputs in the Gradle user home
org.gradle.parallel=true- gradle-wrapper.properties : Helps to install and manage gradle wrappers in your project. It provides few commands or attributes that help to set gradle distribution.
To know more about Gradle, visit page - Gradle Docs | Build Environment
Issues with Gradle in Android Studio -
Though Gradle makes application development easy, it can have some issues too. Gradle Sync Failed is a major problem faced and reported by many users.
There are several reasons why gradle sync fails:
- Bad internet connection
- Issues in Gradle compiler
- Bad cache in Android Studio
- Proxy servers
- Inappropriate way of defining gradle dependencies
- Refreshing caches
- Manually deleting file inside .gradle
Bad internet connection
Gradle requires that you have a working internet connection on your computer. As it downloads all the required versions from the internet which are missing on your computer, it is mandatory to have a proper internet connection.
Disabling Proxy Server
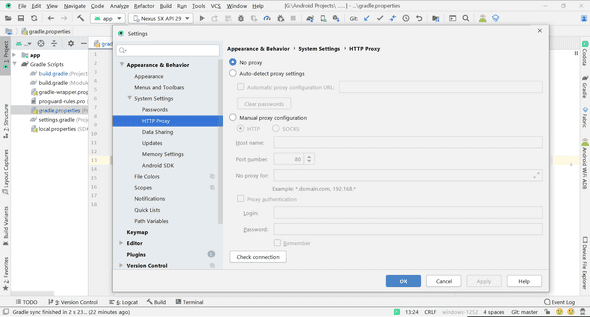
Proxy servers can cause issues in downloading required files for gradle so make sure proxy server is disabled.
To disable the proxy server go to: File → Settings → Appearance and Behaviour → System Settings → HTTP Proxy . In HTTP Proxy setting, select No Proxy, save setting (Apply) and click on OK.

Keep you distributionUrl updated
The Gradle Wrapper script invokes a declared version of Gradle, downloading it if necessary. As a result, developers can get up and running with a Gradle project quickly without having to follow manual installation processes.
Keep your distributionUrl updated. You can get the latest gradle wrappers from Gradle Services | Distribution
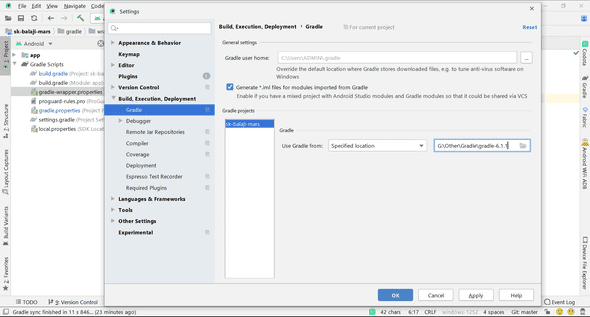
If you’re getting an issue to update gradle wrapper from Android Studio’s gradle-wrapper.properties file, you can manually download wrapper files from the link mentioned above and manually import it from Settings -
Go to File → Settings → Build, Execution, Deployment → Gradle → Use Gradle From
and select Specified Location then select gradle wrapper from your downloaded folder.

Inappropriate way of using gradle dependencies
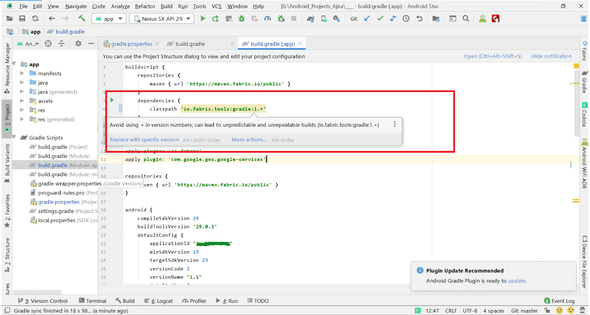
When you’re using any dependency in your app, make sure version number is properly mentioned. Using the latest versions would be great practice.
When you do not mention version number, Gradle may download all the available versions.

You should use an explicit dependency version and keep it updated with latest ones.
Refreshing the Cache
Clearing your cache is also important in order to improve system performance. Android studio provides an “Invalidate cache” option to delete cached files
- Go to File → Invalidate Caches / Restart
- Select Invalidate
- Then Navigate to your Android Studio installation directory and delete cache.
- Then Navigate to your directory where Gradle is installed(.gradle folder). Then go to caches and delete the wrapper file typically present with its version name.
Example -
C:\Users\ADMIN\.gradle\caches\6.1 - Also you need to delete caches present in your applications directory. Navigate to your app directory and delete .idea and
.gradlefolders.
Manually deleting file inside .gradle
Sometimes Android Studio takes too much time to build your project. This generally happens due to inappropriate gradle files i.e some gradle files might be missing or internet connection might be slow. In such cases, users forcefully cancels the build process in order to restart it. But that doesn’t work as some gradle files are being used by the system to build the app.
In such cases users restart Android Studio, try to clear caches, restart their System(PC) but nothing works. This is because some processes are locked by the system and we cannot forcefully restart them.
So to resolve this problem, you need to release the locked processes by system with the help of any process explorer. Process Explorer is an authorized Microsoft product/tool that shows you information about which handles and DLLs processes have opened or loaded or locked.
For more about Process Explorer visit - Microsoft | Process Explorer
Steps to removed locked processes using Process Explorer
- Download Process Explorer and run it in administrative permissions.
- Go to Find → Select → Find Handle or DLL
- Search specific DLL. Right click on it and click Close Handle.
- Follow the same process for all locked handles.
- Now try to delete .gradle from the App directory.
- Rebuild the project again
This was the short introduction of Gradle in Android Studio. I have tried to enlist possible causes of Gradle sync fail issue and available solutions. Hope this article helps you.
Also for detailed explanation about Gradle, Gradle Distribution etc, you can visit - Gradle | User Manual
Thank You!